5 Items I Always Carry In The Wilderness

I wanted to write a quick post detailing the five items that I always carry with me in the wilderness.

Container

I either carry a stainless steel bottle, pot or a Grayl water purifier. Since water is so important to our survival, you want to make water procurement as easy as possible.

If the low temperatures over night will be above freezing, I generally always choose to carry my Grayl water purifier. This makes water purification fast and easy. Plus the water always tastes amazing.

If the temperatures will get below freezing at all, then I take either a stainless steel bottle or large bushpot for boiling my drinking and cooking water.

Cover

For cover, besides the seasonal relevant clothing I’m already wearing, I carry a poncho that can also be rigged up as a tarp shelter. I love having multifunctional gear as long as it is useful and works well for both intended purposes, which I believe the one I carry does.

Having the availability to make a quick shelter to get out of the rain, wind, snow or to just create a micro climate to warm up, is extremely beneficial. To be able to setup a quick shelter without the need of natural resources is a time and calorie saver. In the event of a true emergency, I’d want to be able to setup my shelter as quickly as possible and save any energy on gathering fuel for a fire and water purification. Also, if I were hurt, it would be extremely hard to build a natural shelter depending on the type of injury.

Cordage

I always carry a hank of 550 Paracord with me. It can be used for so many projects around camp from shelter building to an endless amount of camp projects. It can also be used for fishing, primitive trapping and gear repair, just to name a few. I also usually carry a 25’ piece of #36 bankline which is a great complimentary cordage to Paracord.

Fire kit

I carry a leather belt pouch I made out of stone oiled kodiak leather. It contains my extensive fire kit. My fire kit contains a flint and steel kit, char material in a tin, lighter, magnifying lens, quik tinder tabs, fat wood fuzz, a chunk of fat wood, fero rod, opinel pocket knife and some jute twine.

Knife

I always carry a good fixed blade knife that I know I can depend on. Having a good knife can make camp chores a lot easier, allow for game processing, opens up a lot of projects that can be done around camp to stay busy and keep the mind focused if lost and in an emergency situation. A knife is a great tool as long as care is taken and it is used in a safe manner.

This is not an extensive kit by any means, and these are not the only items I generally carry, but these five items are always with me. This is a basis for my wilderness wandering kit. I’m confident in this basic kit barring any serious life threatening injuries. I do carry varying first aid kits when wandering wild places.

What are your top five stay alive items that you always carry, whether urban or wilderness?

Pack Weight

Here’s a list of what each of our packs weighted for our most recent family camping trip.

*Weights do not include water or food (consumables) I carried all of the food.


Me: Hidden Woodsman Deepwoods Pack Loaded Weight 37.2 Lbs

Wife: Hidden Woodsman Dayruck Pack Loaded Weight 22.6 Lbs

15 Year Old: Hidden Woodsman Dayruck Pack Loaded Weight 15 lbs

12 Year Old: Rothco Mini Alice Pack Loaded Weight 15 lbs

11 Year Old: Urban Mountain Pack Loaded Weight 16.2 lbs

6 Year Old: Hidden Woodsman Dayruck Scout Pack Loaded Weight 7.4 lbs

4 Year Old: Ozark Trail Daypack Loaded Weight 5 lbs

As you can see, our packs were not very heavy. We did not lack for anything or suffer. We had everything we needed and a few extra’s. The youngest two carried only their extra clothing, sleeping bags, cup, spoon and bandanna. My wife and I carried the extra things they needed. We had a great time in a beautiful place and can’t wait to get out again.

I hope this inspires others to lighten the load and get out and enjoy the wild places that are available all around us. What things are a must for you to take camping? Have you ever primitive camped? Thanks for stopping by and please like and leave a comment with your answers or thoughts about the above questions.

group.jpg

group2.jpg


Waxing Gear

A simple more traditional way to waterproof your clothing or gear is to use Greenland wax. I own a couple pairs of Fjallraven Vidda pro trousers and one of their granite wool flannel shirts. When I ordered my first pair of Fjallraven pants I also ordered some of their Greenland wax.

It was time to wax/waterproof my pants and the shoulders on my granite shirt so I grabbed the wax and my heat gun. Putting the wax on is simple. All you have to do is rub the wax on whatever you’re treating like you’re coloring in a coloring book.

Once each garment was completely covered in wax, I grabbed my heat gun. I set the heat gun on the lowest setting and took care to constantly keep the heat gun moving so not to burn the garment.

There’s something very satisfying about watching the wax melt into each garment and disappear. It didn’t take me much time at all to treat my two pairs of pants and flannel. Since I had the wax out, I decided to wax my Hidden Woodsmen Deepwoods Ruck. It turned out pretty good. We’ll see how well it worked this weekend well I’m out.

Do you wax any of your gear? What type of wax do you use? Let me know what you think in the comments section down below. Have a wonderful day and get out into the wild places and use that gear you’ve bought.

CP Kydex Bushcraft Knife Sheath


This past weekend I received my new sheath for my Casstrom Lars Falt Knife. CP Kydex (Country Prepper) made me an updated version of his “bushcraft” sheath. If you’ve never owned one of his sheaths or are aware of him, you’re missing out. I argue that he is one of the best kydex knife sheath makers. I love the quality of his work and how he melds leather and kydex together in a beautiful functional way.

s2.jpg

s1.jpg

I own the first generation “bushcraft” model sheath for my Mora Garberg. That sheath has held up wonderfully and I still love it today. I love that I have so many possibilities at my fingertips. The newer model is bigger and has a larger tin mounted on the back to use for whatever you’d like. In the small tin on my Garberg, I have some quick tinders and a fishing kit. With this larger tin I’m able to carry more quick tinders, a larger fishing kit, a sail needle and some stormproof matches. On the older model you received #36 bankline but on the new sheaths you can choose #36 bankline or Titan Survival Cord wrapped around the sheath. I still chose bankline because that’s what I prefer to use for bowdrills and many other things. I usually always have some 550 cord with me anyways.

s4.jpg

s3.jpg

I also own a sheath that CP Kydex made for my Mora Eldris as well as a mini bic lighter carrier. Here’s a link to his etsy store; www.etsy.com/shop/CPKydex

s5.jpg

I look forward too many years of service from this sheath, like I have from the other ones he’s made for me. I can’t recommend his sheaths enough. If I could, I’d own one of his sheaths for every knife I own. Do you own any CP Kydex Sheaths? Do you like kydex for knife sheaths? What are your thoughts on the look and functionality of these sheaths? Feel free to leave a comment with your answer to any of these questions. Thanks for stopping by and have fun out there exploring this beautiful world.

Quick Tip #21

So, you made it to where you want to camp for the night, and you’re all setup, then you realize it’s going to be dark soon and you start scrambling around to gather natural tinder and wood to get a fire going. Does this sound like your normal routine? It used to be mine years ago until I started carrying a tinder pouch on my belt. Now as I hike along, I gather natural tinder, birch bark, small twigs and anything else I might be able to use to make a “birds nest” and get a fire going. I also grab a few pieces of wood (sticks) that are slightly thicker than my thumb and break them short enough to fit in the pouch. I use these for making feather sticks.

Carrying a tinder pouch and filling it as you hike makes for a less stressful time later trying to get a fire going and it means you’ll most likely have better quality material to work with. Some advantages to carrying a tinder pouch are that everything you put in the pouch gets mixed together and ground together as you hike and if anything is damp it will help dry it out by the time you get to camp. Also, if it starts raining along the way or by the time you get to camp or before you get a fire going, you’ll have a bag full of quality dry tinder to work with instead of trying to scrounge around in the rain.

I highly recommend training yourself to grab natural tinder as you hike, whether you put it in your pocket, pack or designated tinder pouch, you’ll thank me later when you have a much easier and relaxed time starting a nice warm cozy fire. Do you already carry a designated tinder pouch? If so, what natural things do you grab to fill your pouch? Thanks for stopping by and feel free to leave a comment with your answers to the previous questions.

Ax and Saw Leather Carry Bag

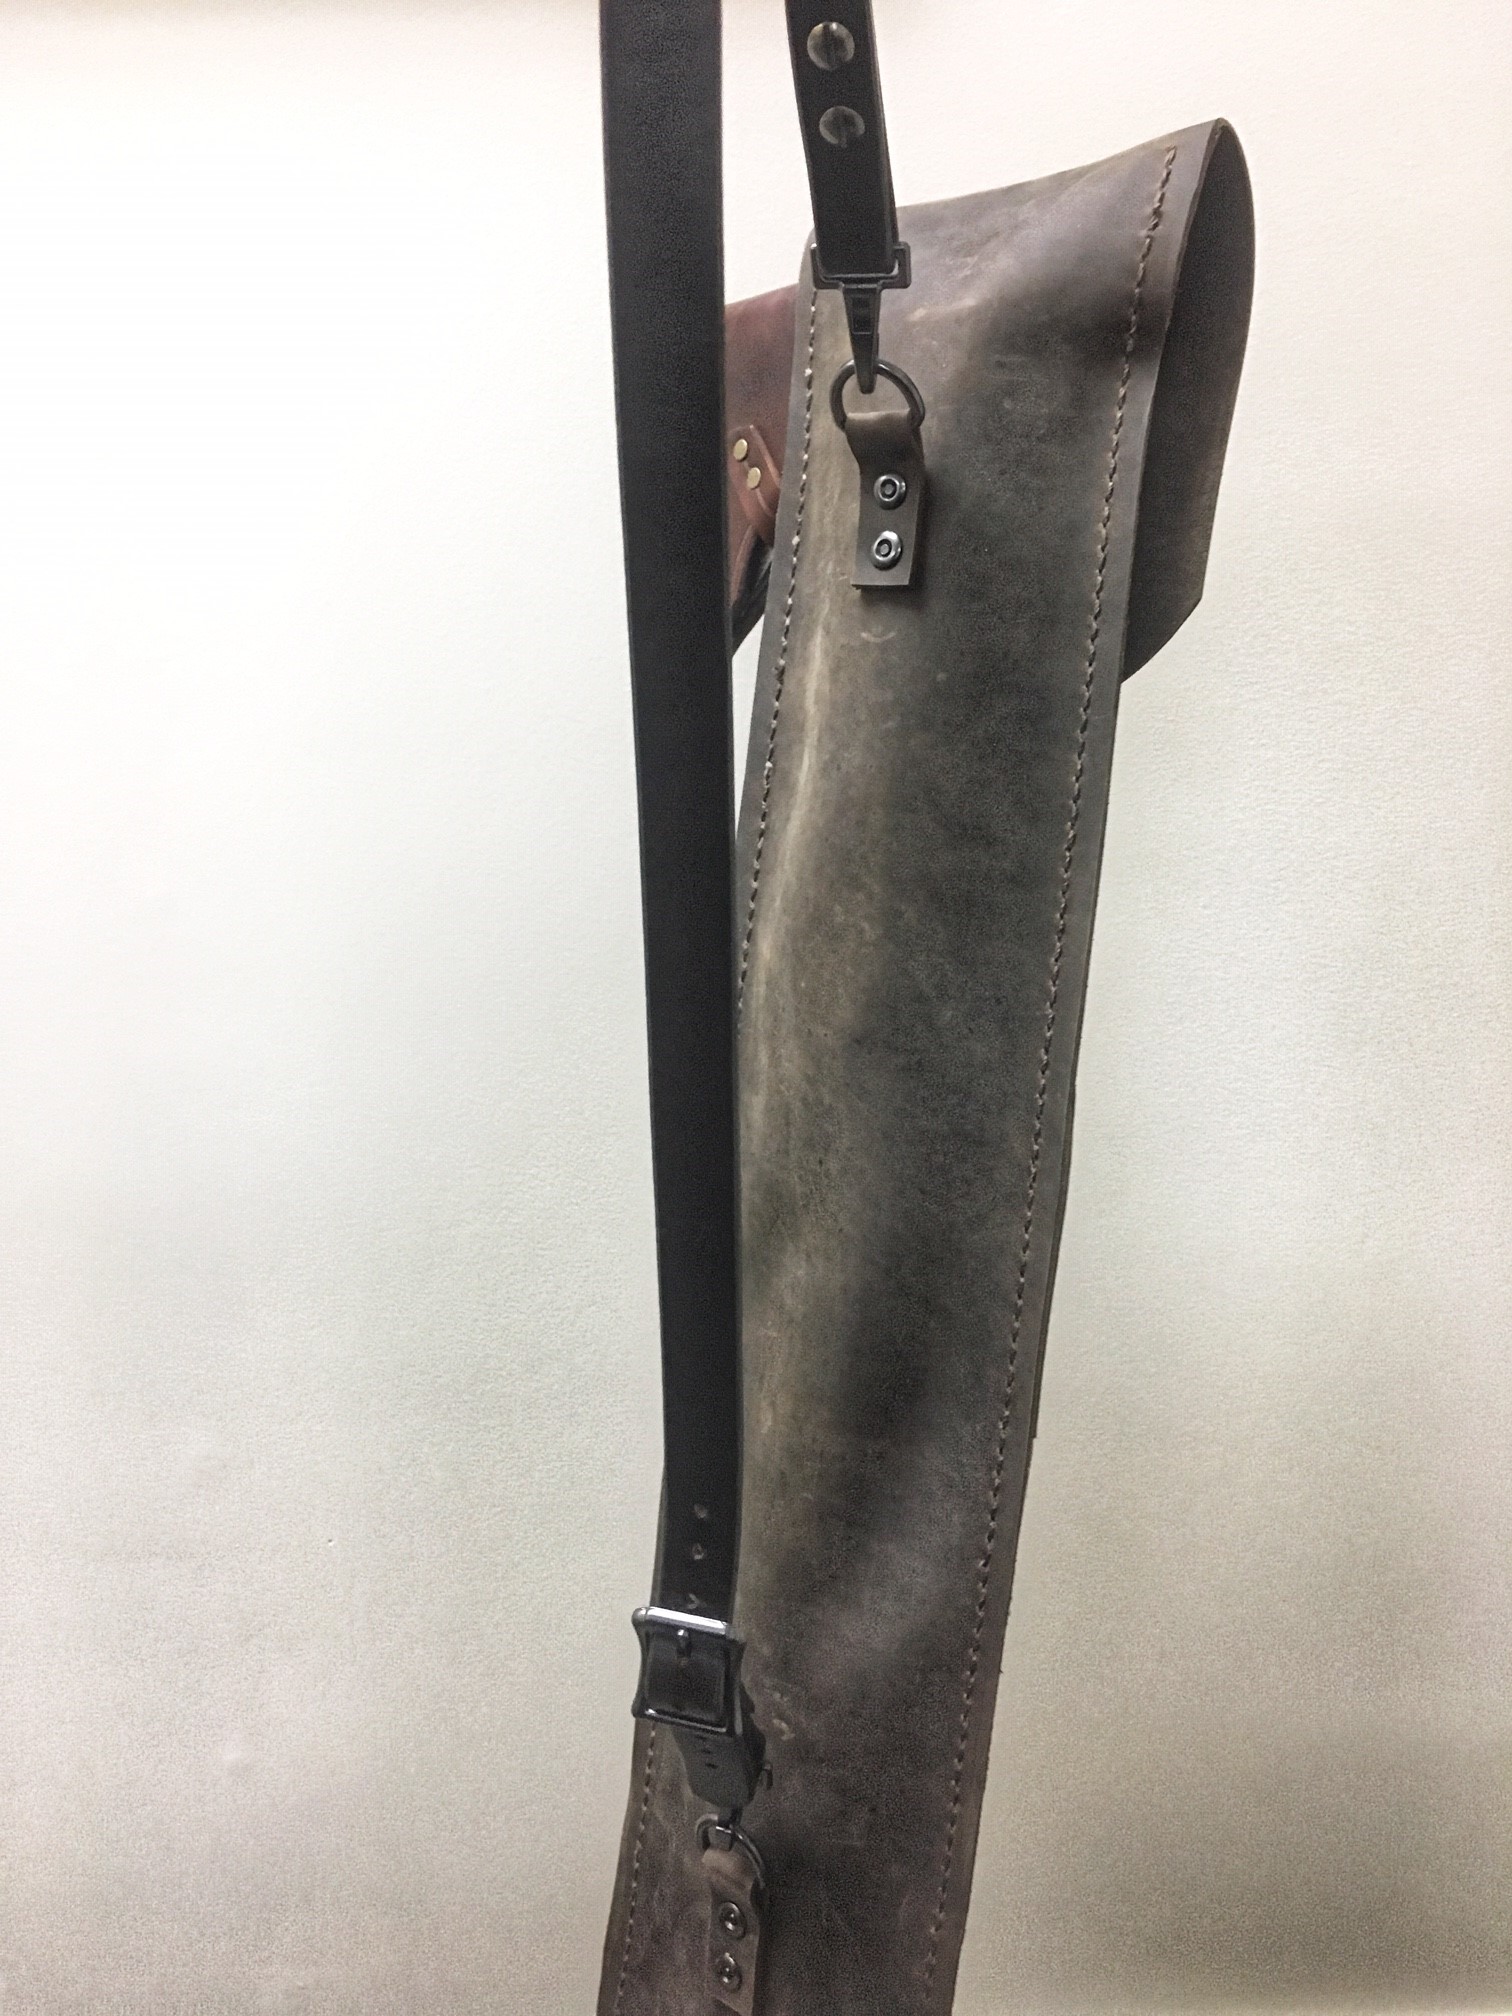
For awhile now I’ve wanted an ax and saw carry bag. I really like the one Meandering Maker makes as well as Bear Essentials, but I didn’t want to spend the money, even though I know both bags are well worth the money. I thought to myself, why not make one out of leather? I’ve never seen anyone else make one solely out of leather and I had just acquired some nice 4-5 oz Kodiak stone oiled leather that I really liked the look of. So, I quickly began thinking about how I wanted to make it and what I wanted it to look like.

I made sure to design the size of my bag so that I could fit my Boreal21 saw or a 24” take down buck saw once I get one made. When cutting the leather for the ax sleeve I laid my ax on the main pouch and then ran the piece of leather over the ax that would form the ax sleeve and cut it so that when the ax was removed it still formed a pocket.

ax3.jpg

I saddle stitched the whole bag and retention strap with waxed thread. I used Chicago screws to attach the anchor points for the shoulder strap as well as on the shoulder strap pieces so that it would make for easy maintenance or changing out any parts that fail over time.

ax5.jpg

ax6.jpg

ax1.jpg

ax7.jpg

I used 8-9 oz veg. tanned leather for the carry strap and made sure to have enough adjustment for use during warm months as well as colder months over thick jackets.

I really like how my new ax and saw bag turned out. It should last me years of use and I should hopefully be able to pass it on to my kids someday. The only thing that I wish I had added was a small pouch to hold a sharpening puck. I decided what I’m going to do is make a small pouch that will hold the sharpening puck and a fire kit that will mount on the bottom of the shoulder strap but is easily removable so that it can be placed on my belt. What do you think about the bag? What would you change or add? Any leather projects your working on? Have you ever thought about using an ax and saw carry bag? I’ll keep everyone posted on how well the bag holds up as I use it over this year. Thanks for stopping by and enjoy your wilderness wandering.     ax2.jpg

ax4.jpg

Homemade Pulk Sled

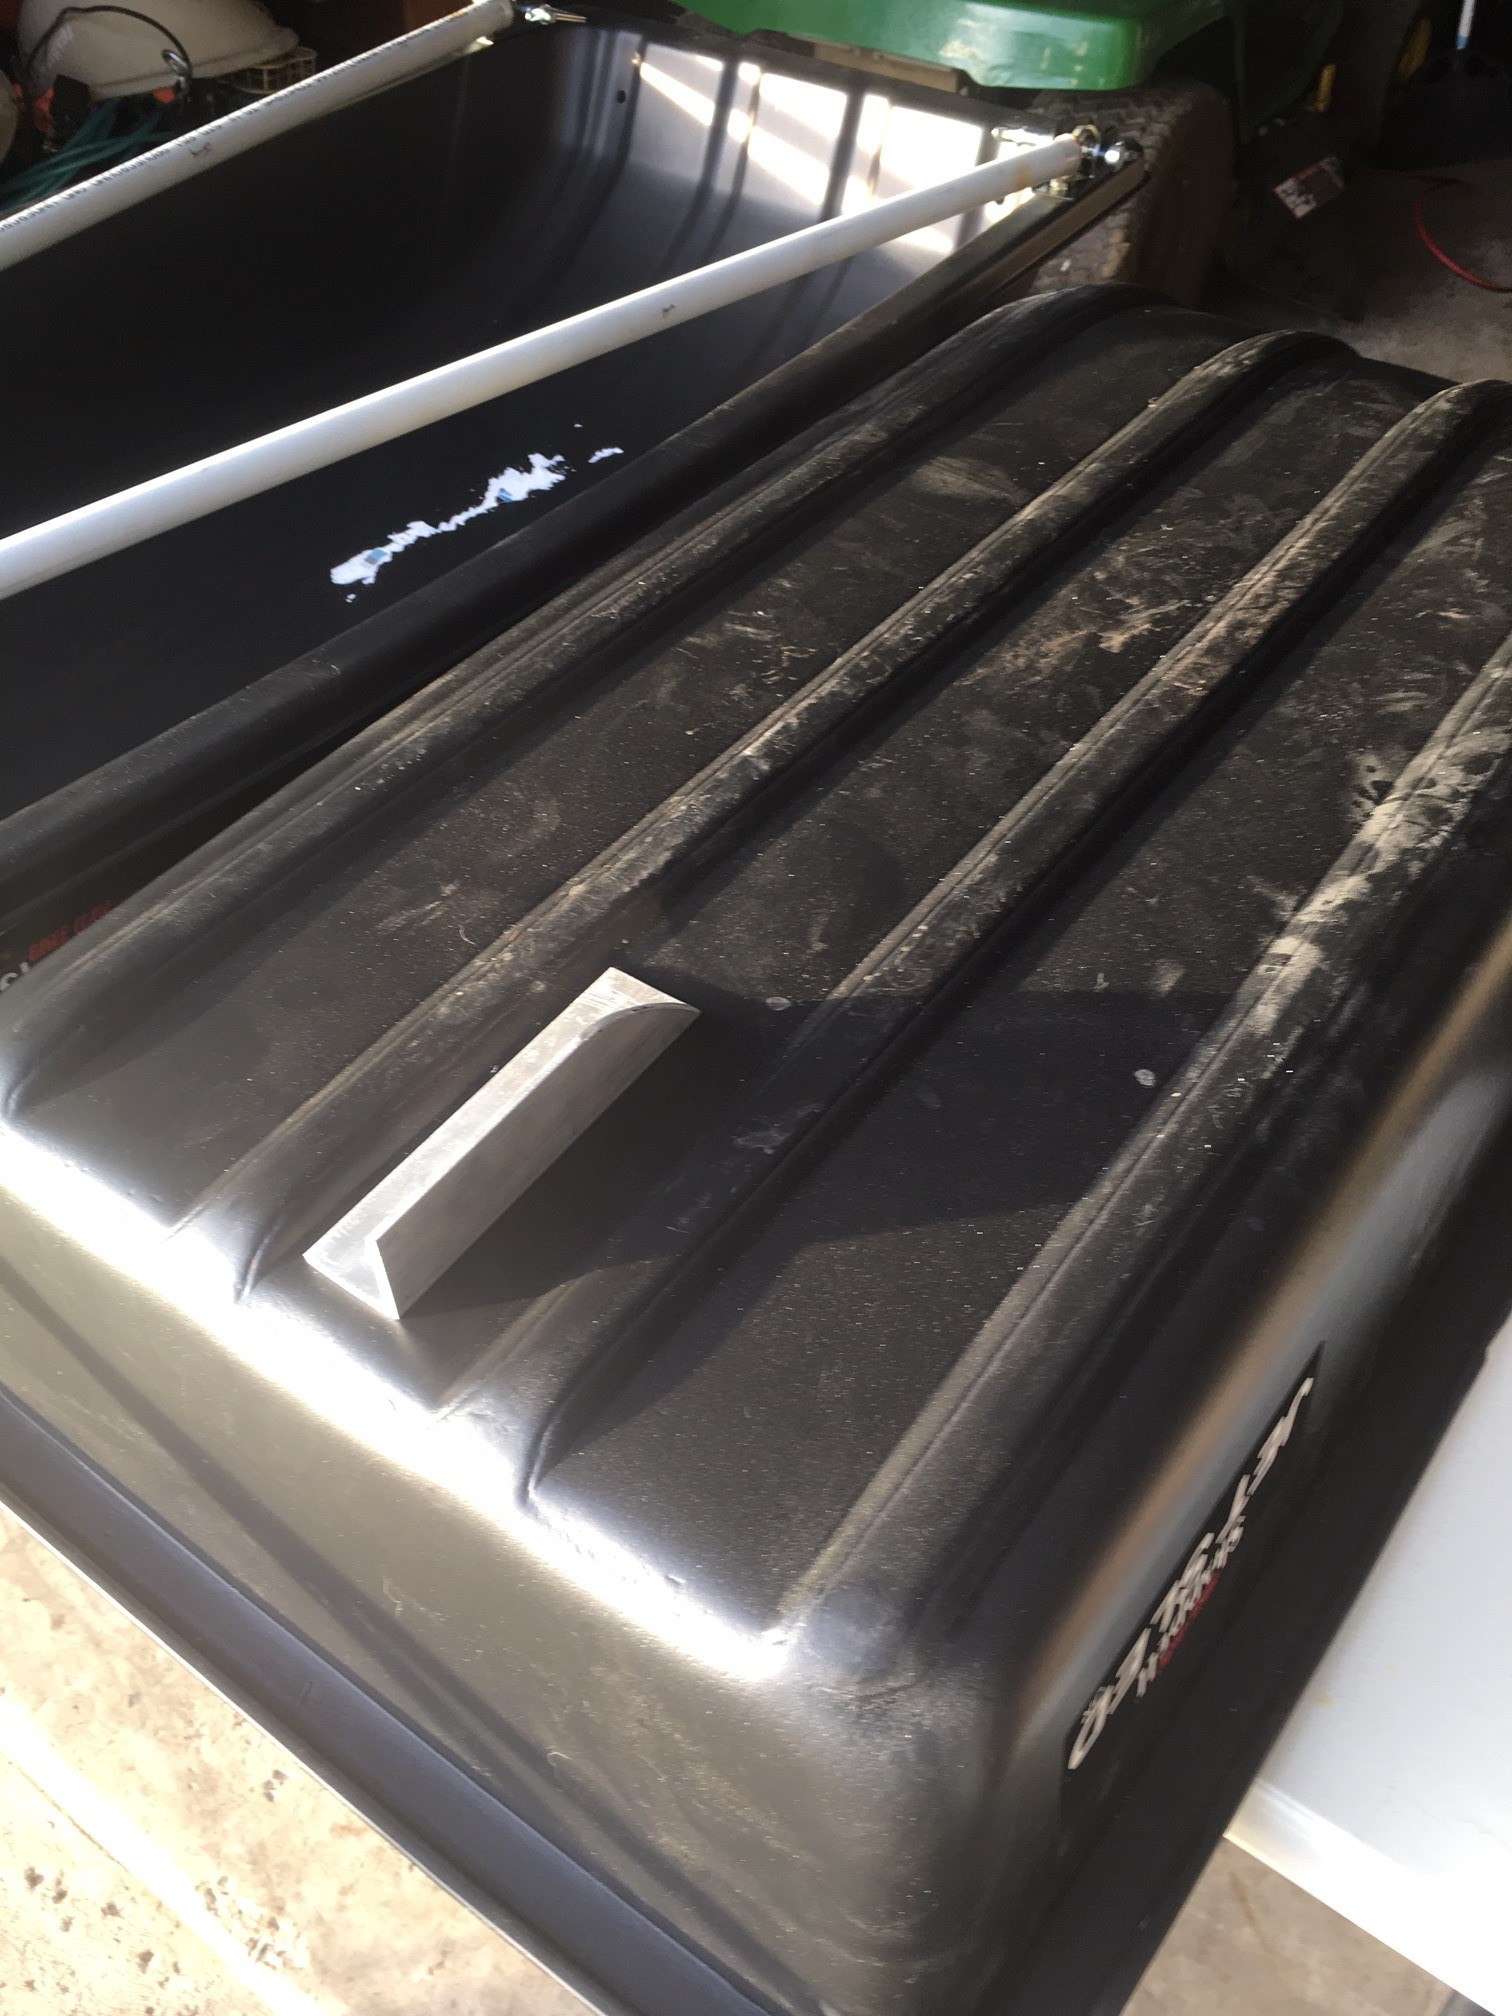
I’ve wanted to make a pulk sled for winter camping for a while now, so I decided making a pulk sled was next on my list of D.I.Y. projects. I was excited to find that my local Runnings store was running a sale on Jet Sled Jr’s so I grabbed two of them. I figured I’d make two sleds so that either, one of my sons could use one or my brother. I crafted brackets out of some steel stock I grabbed from the hardware store. After shaping the brackets and painting them, I mounted them on the front of the sled with stainless steel bolts and fasteners.

sled10.jpg

I added a fin, made from aluminum angle stock, on the rear bottom of the sled. I used galvanized fasteners to attach the fin. This helps with tracking in the snow especially when in hilly areas.

sled4.jpg

sled5.jpg

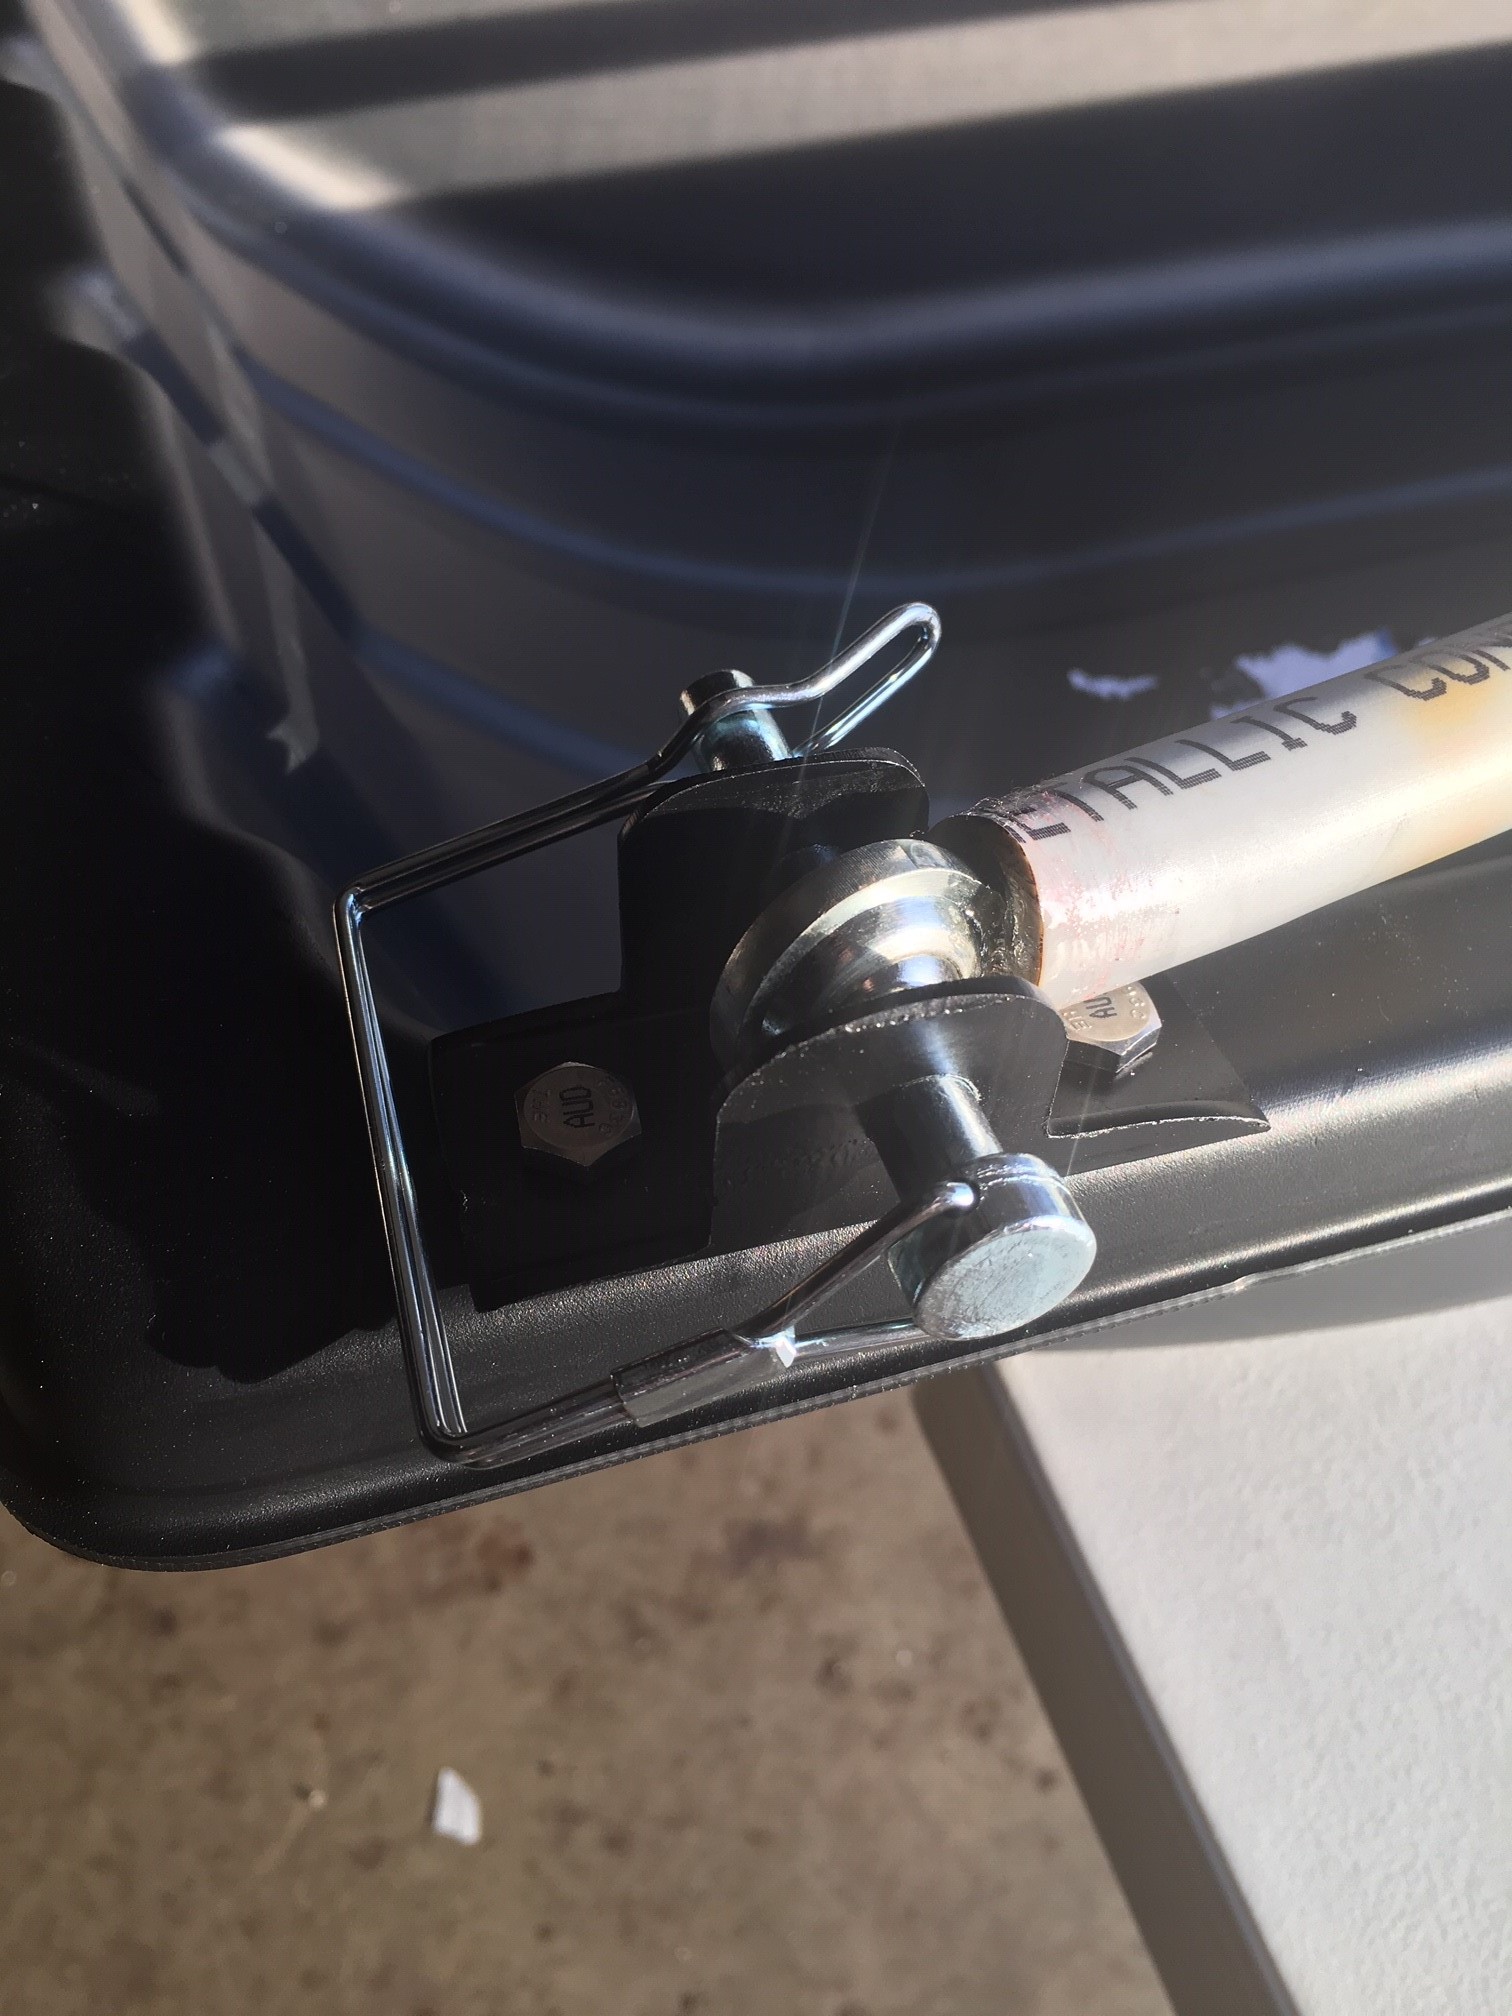
I used plastic electrical conduit for the poles that connect to the sled and a leather belt for pulling. I used two pieces of conduit because I wanted six foot poles. If I were to make the poles five feet instead of six feet I would have only needed one conduit. On one end of each pole I epoxied a tie rod end and the other end epoxied an eye bolt. Prior to adding epoxy, I heated up the conduit so that I could push the nut for the eye bolt and the nut for the tie rod end in, to make a more secure attachment. The tie rod end connects to the bracket on the sled using a locking pin.

sled8.jpg

sled7.jpg

The eye bolt on the other end of the poles connects to clevis pins which I mounted on either side of a leather belt I made. I put a washer on both sides of the belt before installing the clevis pin and then added a heavy bushing which fit perfectly inside the eye bolt and over the clevis pin. Lastly, I added a hitch pin to keep the eye bolt in place but to also make it easily removable once at camp.

sled13.jpg

sled11.jpg

sled12.jpg

sled3.jpg

All in all, I think this project went well and the pulk sleds turned out great. I can’t wait to get out and test my new pulk sled. This should make snowshoeing a bit easier without the extra weight from the pack on my back pushing down on the snowshoes. Do you winter camp or snowshoe? Have you ever used or thought about using a pulk sled for winter camping? Let me know in the comments section if you liked this D.I.Y. project and if you’d like to see more.

Sled 1.jpg

sled9.jpg

Practice

With five active and energetic kids its hard to find time to continue to practice bushcraft/wilderness skills that need constant practice. It forces me to be a multitasker and to think outside the box.

Here’s an example; just the other night, we have a wood/coal furnace, I needed to get a fire going in the furnace but instead of getting the fire going and just sitting there waiting for it to get up to temperature I figured why not practice bow drill friction fire. It seemed like a better way to spend my time than staring at my phone like I often do well waiting on the furnace. I knew all of the wood was dry, so it wasn’t really a question of whether or not I’d get an ember but more about continued practice and for muscle memory.

It was fun to spend my time doing something more useful and we all know practice makes perfect. I knew I couldn’t be in the wilderness but there was no reason I couldn’t practice wilderness skills. I forget sometimes, as I’m sure others do as well, that we don’t necessarily need to be in the woods to practice our skills. Although that is a nicer environment to practice in, it’s not necessary.

Below are some pictures of the bow drill set I made. It worked great and was smoking within seconds of running the bow and drill. I know we’re all very busy, but I urge you to find time to practice bushcraft/survival skills so that you don’t loose them. Sometimes we must think outside the box when it comes to finding time to learn and practice. What skills are you currently learning or trying to fine tune? Have you ever tried any type of friction fire? Thanks for reading and please leave a comment about what outdoor skills you’re currently learning or fine tuning.fire1.jpg

fire2.jpg

fire3.jpg

Don’t Be Afraid To Try something New

It amazes me how many people are not willing, are afraid, to learn or try something new. Whether it be learning a new skill, learning how to make something or just plain learning. I guess for me it just comes naturally. I’m self-motivated to learn new skills. If I want to know how to do something, I’m going to learn how to do it if it means reading books, scouring the internet and or watching tons of YouTube videos. I can’t imagine letting the fear of not knowing how to do something or the fear of failure stop me from learning a new skill that I desire to know.

In most cases failure in something is not going to hurt you or anyone else. We all have failures during our learning process. Through those failures we can learn and become better. Never let the fear of failure stop you. I contest that you never truly learn a new skill without some failures along the way.

Whether it be a new business venture, life skills, outdoor (survival, bushcraft) skills, learning how to make handmade items, wood work, music, art or anything else, don’t let the fear of failure or the fear of not knowing how to do it, stop you. Try something new today. Learn and don’t be held back by fear. Enjoy the whole process and journey as you learn new skills and gain knowledge.

What is something you’d like to learn how to do or a skill you’d like to learn? What is holding you back? My goal for 2019 is to become more proficient at leather making and crafting tools out of 1095 and O1 tool steel. Leave a comment with one thing you want to learn more about or a new skill you want to learn over the coarse of 2019.

1.jpg

2.jpg


Fire Kit


Pictured are some basic fire kits I made for my older three boys, Father and brother for Christmas. I wanted to make the kit compact but encompass more than most kits do. I put everything in a metal tin (similar to an altoids tin) and included a fero rod, 6 ft of jute twine, a piece of chert and a steel striker I designed, made and heat treated.

I used 1095 steel to make the striker. I drilled an indent in each striker so that they can be used as a baring block for the bow drill, primitive friction fire starting technique. I made all the edges 90 degrees so that the edges can be used to scrape wood for fine shavings or be used to scrape a fero rod.

The tin can be used to make char cloth. They have room to add char cloth as well as add some quik tinder or other modern tinder for fire starting. Hopefully sometime soon I’ll be able to sit down and teach them all how to start a flint and steel fire. I did teach my older son, who was excited when his first try was a success. I’m sure they’ll be addicted to starting a fire in the wilderness this way, just as I am. Flint and steel is by far my favorite way to get a fire going. What’s your favorite fire-starting method? Have you ever used flint and steel or any primitive friction methods? I added some pictures of me heat treating the steel strikers in my simple forge.

kit.jpg

kit2.jpg

kit4.jpg

kit5.jpg

kit6.jpg