CP Kydex Bushcraft Knife Sheath


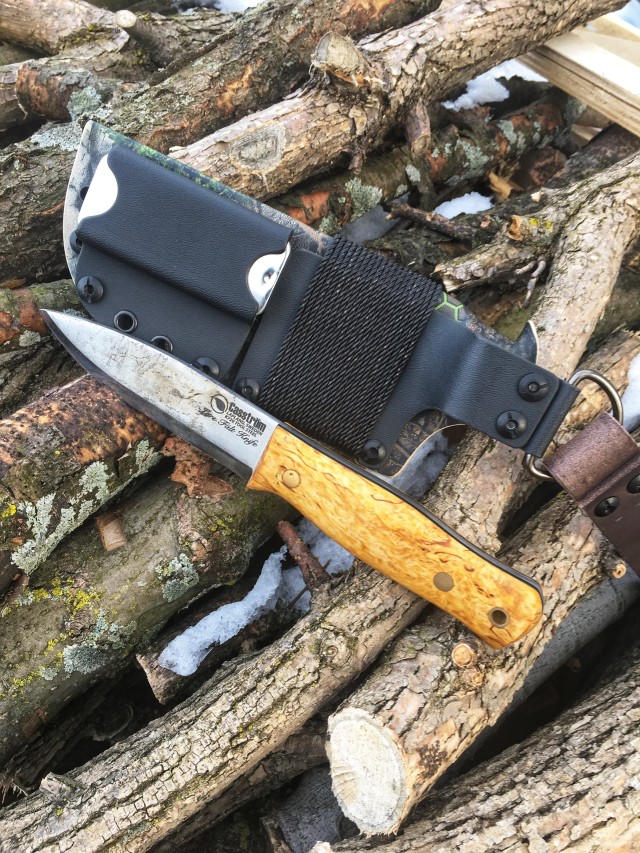
This past weekend I received my new sheath for my Casstrom Lars Falt Knife. CP Kydex (Country Prepper) made me an updated version of his “bushcraft” sheath. If you’ve never owned one of his sheaths or are aware of him, you’re missing out. I argue that he is one of the best kydex knife sheath makers. I love the quality of his work and how he melds leather and kydex together in a beautiful functional way.

s2.jpg

s1.jpg

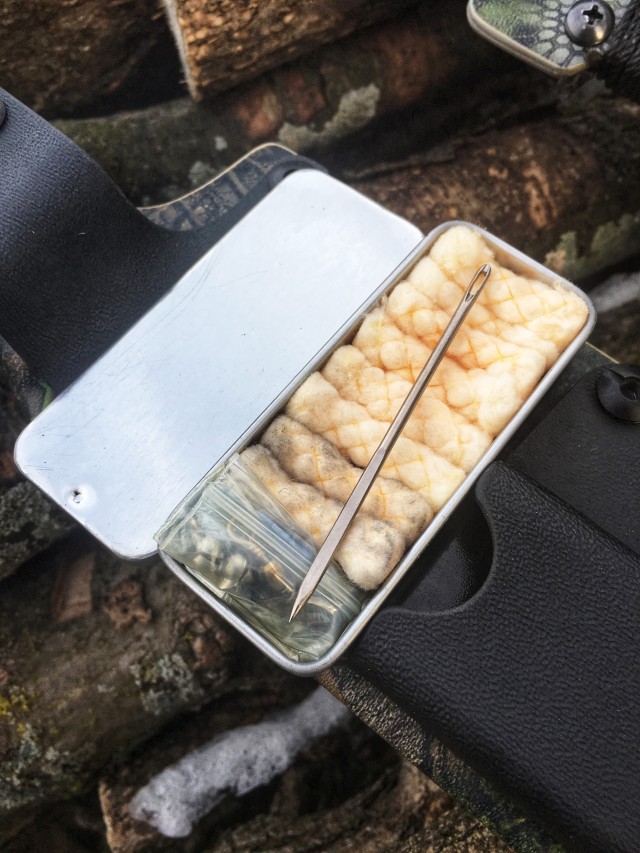
I own the first generation “bushcraft” model sheath for my Mora Garberg. That sheath has held up wonderfully and I still love it today. I love that I have so many possibilities at my fingertips. The newer model is bigger and has a larger tin mounted on the back to use for whatever you’d like. In the small tin on my Garberg, I have some quick tinders and a fishing kit. With this larger tin I’m able to carry more quick tinders, a larger fishing kit, a sail needle and some stormproof matches. On the older model you received #36 bankline but on the new sheaths you can choose #36 bankline or Titan Survival Cord wrapped around the sheath. I still chose bankline because that’s what I prefer to use for bowdrills and many other things. I usually always have some 550 cord with me anyways.

s4.jpg

s3.jpg

I also own a sheath that CP Kydex made for my Mora Eldris as well as a mini bic lighter carrier. Here’s a link to his etsy store; www.etsy.com/shop/CPKydex

s5.jpg

I look forward too many years of service from this sheath, like I have from the other ones he’s made for me. I can’t recommend his sheaths enough. If I could, I’d own one of his sheaths for every knife I own. Do you own any CP Kydex Sheaths? Do you like kydex for knife sheaths? What are your thoughts on the look and functionality of these sheaths? Feel free to leave a comment with your answer to any of these questions. Thanks for stopping by and have fun out there exploring this beautiful world.

Quick Tip #21

So, you made it to where you want to camp for the night, and you’re all setup, then you realize it’s going to be dark soon and you start scrambling around to gather natural tinder and wood to get a fire going. Does this sound like your normal routine? It used to be mine years ago until I started carrying a tinder pouch on my belt. Now as I hike along, I gather natural tinder, birch bark, small twigs and anything else I might be able to use to make a “birds nest” and get a fire going. I also grab a few pieces of wood (sticks) that are slightly thicker than my thumb and break them short enough to fit in the pouch. I use these for making feather sticks.

Carrying a tinder pouch and filling it as you hike makes for a less stressful time later trying to get a fire going and it means you’ll most likely have better quality material to work with. Some advantages to carrying a tinder pouch are that everything you put in the pouch gets mixed together and ground together as you hike and if anything is damp it will help dry it out by the time you get to camp. Also, if it starts raining along the way or by the time you get to camp or before you get a fire going, you’ll have a bag full of quality dry tinder to work with instead of trying to scrounge around in the rain.

I highly recommend training yourself to grab natural tinder as you hike, whether you put it in your pocket, pack or designated tinder pouch, you’ll thank me later when you have a much easier and relaxed time starting a nice warm cozy fire. Do you already carry a designated tinder pouch? If so, what natural things do you grab to fill your pouch? Thanks for stopping by and feel free to leave a comment with your answers to the previous questions.

Ax and Saw Leather Carry Bag

For awhile now I’ve wanted an ax and saw carry bag. I really like the one Meandering Maker makes as well as Bear Essentials, but I didn’t want to spend the money, even though I know both bags are well worth the money. I thought to myself, why not make one out of leather? I’ve never seen anyone else make one solely out of leather and I had just acquired some nice 4-5 oz Kodiak stone oiled leather that I really liked the look of. So, I quickly began thinking about how I wanted to make it and what I wanted it to look like.

I made sure to design the size of my bag so that I could fit my Boreal21 saw or a 24” take down buck saw once I get one made. When cutting the leather for the ax sleeve I laid my ax on the main pouch and then ran the piece of leather over the ax that would form the ax sleeve and cut it so that when the ax was removed it still formed a pocket.

ax3.jpg

I saddle stitched the whole bag and retention strap with waxed thread. I used Chicago screws to attach the anchor points for the shoulder strap as well as on the shoulder strap pieces so that it would make for easy maintenance or changing out any parts that fail over time.

ax5.jpg

ax6.jpg

ax1.jpg

ax7.jpg

I used 8-9 oz veg. tanned leather for the carry strap and made sure to have enough adjustment for use during warm months as well as colder months over thick jackets.

I really like how my new ax and saw bag turned out. It should last me years of use and I should hopefully be able to pass it on to my kids someday. The only thing that I wish I had added was a small pouch to hold a sharpening puck. I decided what I’m going to do is make a small pouch that will hold the sharpening puck and a fire kit that will mount on the bottom of the shoulder strap but is easily removable so that it can be placed on my belt. What do you think about the bag? What would you change or add? Any leather projects your working on? Have you ever thought about using an ax and saw carry bag? I’ll keep everyone posted on how well the bag holds up as I use it over this year. Thanks for stopping by and enjoy your wilderness wandering.     ax2.jpg

ax4.jpg

Fire Kit


Pictured are some basic fire kits I made for my older three boys, Father and brother for Christmas. I wanted to make the kit compact but encompass more than most kits do. I put everything in a metal tin (similar to an altoids tin) and included a fero rod, 6 ft of jute twine, a piece of chert and a steel striker I designed, made and heat treated.

I used 1095 steel to make the striker. I drilled an indent in each striker so that they can be used as a baring block for the bow drill, primitive friction fire starting technique. I made all the edges 90 degrees so that the edges can be used to scrape wood for fine shavings or be used to scrape a fero rod.

The tin can be used to make char cloth. They have room to add char cloth as well as add some quik tinder or other modern tinder for fire starting. Hopefully sometime soon I’ll be able to sit down and teach them all how to start a flint and steel fire. I did teach my older son, who was excited when his first try was a success. I’m sure they’ll be addicted to starting a fire in the wilderness this way, just as I am. Flint and steel is by far my favorite way to get a fire going. What’s your favorite fire-starting method? Have you ever used flint and steel or any primitive friction methods? I added some pictures of me heat treating the steel strikers in my simple forge.

kit.jpg

kit2.jpg

kit4.jpg

kit5.jpg

kit6.jpg

Sometimes Cheap Is Better

During hunting season here in New York, it can be a challenge to keep your fingers warm. Especially since you don’t want thick gloves or mittens on that will infringe on being able to pull the trigger. I own many pairs of gloves, mittens and glove/mitten combos but nothing worked very well for me. As of late I was wearing a lightweight pair of gloves (pair I ware for bow season) with cheap wool liner gloves over top with the fingers cut off. This setup worked fairly well until the temps dipped down into the teens and single digits (Fahrenheit) this season. My fingers and hands were not happy. My brother and I happened to stop at Herb Philipson’s (local sporting goods store) and saw a huge display of fleece lined rag wool glove/mittens. I tried a pair on and thought to myself this might be what we need to keep our hands warm. The best part………they were only $9.99! You can’t beat that for a glove that ended up keeping our hands happy the rest of the season!

With the fleece lining it makes the gloves a little thicker and warmer but with no fingers it allowed for easy trigger pulling and with the availability of the mitten cover being pulled over the fingers made for an ideal glove in my opinion. For really cold mornings we threw hot hands (chemical hand warmers) in the mitten part and when the mitten was pulled over, the warmer would be sitting on top of our fingers keeping them warm without interfering with being able to pull the trigger.

On the last day of hunting season, we stayed out through hours of freezing rain and sleet. Even though our wool gloves were soaked, they kept our hands warm. I can attest to wool keeping you warm even when wet/soaked. Needles to say we were happy campers with our recent purchase. I found that I could pull the trigger even with the mitten part over my fingers. Another nice feature is that the wrist part of the gloves is extra-long, so they easily roll over or under the sleeve of a jacket and stay put because of the extra length. No gaps for wind and cold to get into.

All in all, we are very happy with our inexpensive purchase that replaced many more expensive pairs of gloves that just didn’t cut it in cold weather. I can’t believe I’ve never come across a pair of these gloves until now. What gloves or mittens have you found that work great for cold weather well hunting? What cold weather clothing is a must for you? Thanks for reading and I hope everyone has a wonderful Christmas.

g1.jpg

g2.jpg

g3.jpg

g4.jpg

g5.jpg

The Hidden Woodsman Deepwoods Ruck

My dad and I have both purchased The Hidden Woodsman Deepwoods Ruck. Mine is mounted on a frame from http://www.tacticaltailor.com with their shoulder straps and hip belt. My dads is mounted on the military issue alice pack frame with straps and hip belt. It is definitely worth getting the straps and belt from Tactical Tailor. The pack rides so comfortably with all of the extra padding and padding coverage. My dad will definitely be upgrading soon. You can see bellow how much nicer the Tactical Tailor shoulder straps ride and cover than the military issue ones do.

1.jpg

3.jpg

2.jpg

We both absolutely love these packs. There’s plenty of room for everything we prefer to carry. I like the sleeve on the front for carrying a small axe or hatchet and the molle webbing on top and bottom for adding sleeping pads or bedrolls as well as attaching most anything we’d want to. The side pockets have ample room for needed gear, first aid kits, cook kits, water bottles or whatever else you’d like to put in them. The separations inside the main compartment are perfect for my uses and not over done like a lot of packs these days. The quality of materials is also a plus. I like that I don’t have to worry about abrasions or being rough with this pack. I can hang it on a tree, set it on the ground or hike through dense wilderness or brush with no worries about it tearing holes in the pack.

4.jpg

5.jpg

13.jpg

14.jpg

I can’t recommend this pack enough or any of the other quality gear I’ve purchased from http://www.thehiddenwoodsmen.com My dad and I are both looking forward to years of service from these packs. We both also own Dayrucks and like those as well. I use my Dayruck for warmer camping and wanted this pack for colder weather camping since I knew I’d want to carry more gear/clothing. Its also a huge plus to know that these packs were made not to far from where we live. I love supporting people that I’ve met, live in the same country as I do and that make high quality products. Hopefully you’ll be seeing these packs featured in photos of more trips over the coming years. If you own one of these packs, what are your thoughts about it? What do you like or not like about it? Thanks for reading and I hope you all get a chance to get out and enjoy some wilderness wandering.

Quick Tip #20

If you’re tired of getting smoke in your face and wasting your breath get yourself a V3-pocket bellows. They are awesome! It will help direct your air exactly where you want it to go and you can get a longer sustained blow. Instead of having only a little of your breath of air actually reach the dying fire you can now have all of it reach the base of the fire with no smoke in the face or burnt eye brows.

33.jpg

Flint and steel failure with a waxed disk in the rain

This past weekend I went out with my dad for an overnighter. After we hiked in and got our camp all setup, it was time to process fire wood and get a fire going for dinner. We got plenty of firewood processed down into all the different sizes we needed and then of coarse it began to rain steadily.

My favorite way to start a fire is with flint and steel with a piece of char cloth. I had one piece of char cloth left in my tin, so I decided to use a fluffed waxed disc. Every time a spark hit the fluffed waxed disk it just went out. I could not get it to light. After a few minutes of trying, I decided to grab my last piece of char cloth and use that. I turned the waxed disk into a sort of birds nest to receive the lit char cloth. The char cloth lit with only one strike of the steel on the flint. I blew on the char cloth to make sure and sure enough the spark took. I then placed the char cloth in the birds nest made from the waxed disk and blew. The char cloth kept burning but the disk just would not light. I’m not sure why but I was shocked. After blowing and getting a lot of smoke and light from the char cloth I got nothing from the waxed disk. Once the char cloth was fully consumed I gave up on the flint and steel and grabbed my fero rod. All it took was two slides down the fero rod with my knife, sparks rained down on the waxed disk and shavings and everything lit right up. From what I can gather from this experience is that these waxed disks are great for use with fero rods and lighters but I’m not so sure they’re any good when you’re trying to start a fire with flint and steel. I will definitely be testing this out again to see if my suspicions are true or not. Thus far, when starting a fire with flint and steel, I’ve always had luck with a birds nest made with natural materials and char cloth for the ember. What has your experience been like when using flint and steel? What is your favorite way to start a fire?

After we got the fire going for awhile and had some nice coals built up, we cooked some venison backstraps and potatoes over the fire. Dinner was delicious! The rain mostly stopped once we started cooking. We had a great time and this was definitely a learning lesson for me. Hope you all have a great day and get a chance to get out and enjoy the wilderness well testing and learning some new skills.


11.jpg

33.jpg

44.jpg

Quick Tip #19

This is the time of year to check your local hardware stores, Home Depot, Lowes and Tractor Supply. With heating season in full swing you can find all kinds of pre-made fire starters at many stores at a fairly cheap price. Grab a mixed assortment and give them a try. You may very well find your new favorite fire starter.

fat wood

Every year I grab a few of these bags of Fatwood. They are great and easy to use all year long.


Firestarter

I found these little gems at Tractor Supply. They are made of Fatwood and wax. What more could you ask for? What are some of your favorite fire starters?

Gear I’ve Recently Acquired

I’ve recently acquired three pieces of gear that I’m excited about using and testing. The first one is a Casstrom Knives Lars Falt Bushcraft knife. I can’t speak to its durability over time but out of the box this knife is a beauty. I love the curly birch handle and the knife comes razor sharp out of the box. The knife also comes with a nice simple leather sheath. I also ordered a dangler to add to it because I just prefer my knives to be on a dangler for ease of movement. I’m really looking forward to testing this knife out over the next year and then I’ll post an update of how it holds up to use over the long hall. Based on my first impressions I don’t anticipate any issues with this knife.


Lars Falt Bushcraft Knife


The second item I recently received is a Bushcraft Essentials Bush Box LF stove kit (stainless steel version). I ordered the kit instead of just the stove because I wanted the grate for the top to be able to cook meat or other things right on it without needing a pot or pan. Because of what it is, it’s a bit heavy, but I expected that. It’s really well made and I anticipate it holding up to years of use. The stove also comes with its own pouch which makes storing it in your pack nicer and cleaner. I do still use an alcohol stove and a butane stove as well depending on the type of trip so it’s not like this will be used as my only stove, but who knows, it’s possible I may like this stove enough to stop using my other cooking methods. Only time will tell. This is my first venture into twig stoves so we’ll see how it goes. Most places I hike and camp have plenty of branches laying around so I like the idea of not having to carry all of my fuel.

Bushbox LFStove Kit


The third item is an Expedition Research Bushcraft Grill (regular size not mini). My preferred way of cooking is right over an open fire but I’ve tried other small campfire grates and they’ve always failed because they lacked the grid pattern that this grill does have. There’s not much to say other than I’m looking forward to testing this grill out and will probably christen it with some bacon (one of the things the other grills failed to handle as bacon shrinks as its cooking and would fall through the cracks). It does come with a lightweight pouch so that you can easily store it in your pack without getting other things dirty.

Bushcraft grill bushcraft grill 2

All in all these are three pieces of gear I’m really excited to get in the woods and test out. Hopefully after the holidays are over and with hunting season nearing its end soon here in New York, I’ll have a chance to get out and give these new pieces of gear a try. What new pieces of gear did you acquire that you’re excited to use? Have fun in the wilderness and take time to just “be” and enjoy it.