5 Items I Always Carry In The Wilderness

I wanted to write a quick post detailing the five items that I always carry with me in the wilderness.

Container

I either carry a stainless steel bottle, pot or a Grayl water purifier. Since water is so important to our survival, you want to make water procurement as easy as possible.

If the low temperatures over night will be above freezing, I generally always choose to carry my Grayl water purifier. This makes water purification fast and easy. Plus the water always tastes amazing.

If the temperatures will get below freezing at all, then I take either a stainless steel bottle or large bushpot for boiling my drinking and cooking water.

Cover

For cover, besides the seasonal relevant clothing I’m already wearing, I carry a poncho that can also be rigged up as a tarp shelter. I love having multifunctional gear as long as it is useful and works well for both intended purposes, which I believe the one I carry does.

Having the availability to make a quick shelter to get out of the rain, wind, snow or to just create a micro climate to warm up, is extremely beneficial. To be able to setup a quick shelter without the need of natural resources is a time and calorie saver. In the event of a true emergency, I’d want to be able to setup my shelter as quickly as possible and save any energy on gathering fuel for a fire and water purification. Also, if I were hurt, it would be extremely hard to build a natural shelter depending on the type of injury.

Cordage

I always carry a hank of 550 Paracord with me. It can be used for so many projects around camp from shelter building to an endless amount of camp projects. It can also be used for fishing, primitive trapping and gear repair, just to name a few. I also usually carry a 25’ piece of #36 bankline which is a great complimentary cordage to Paracord.
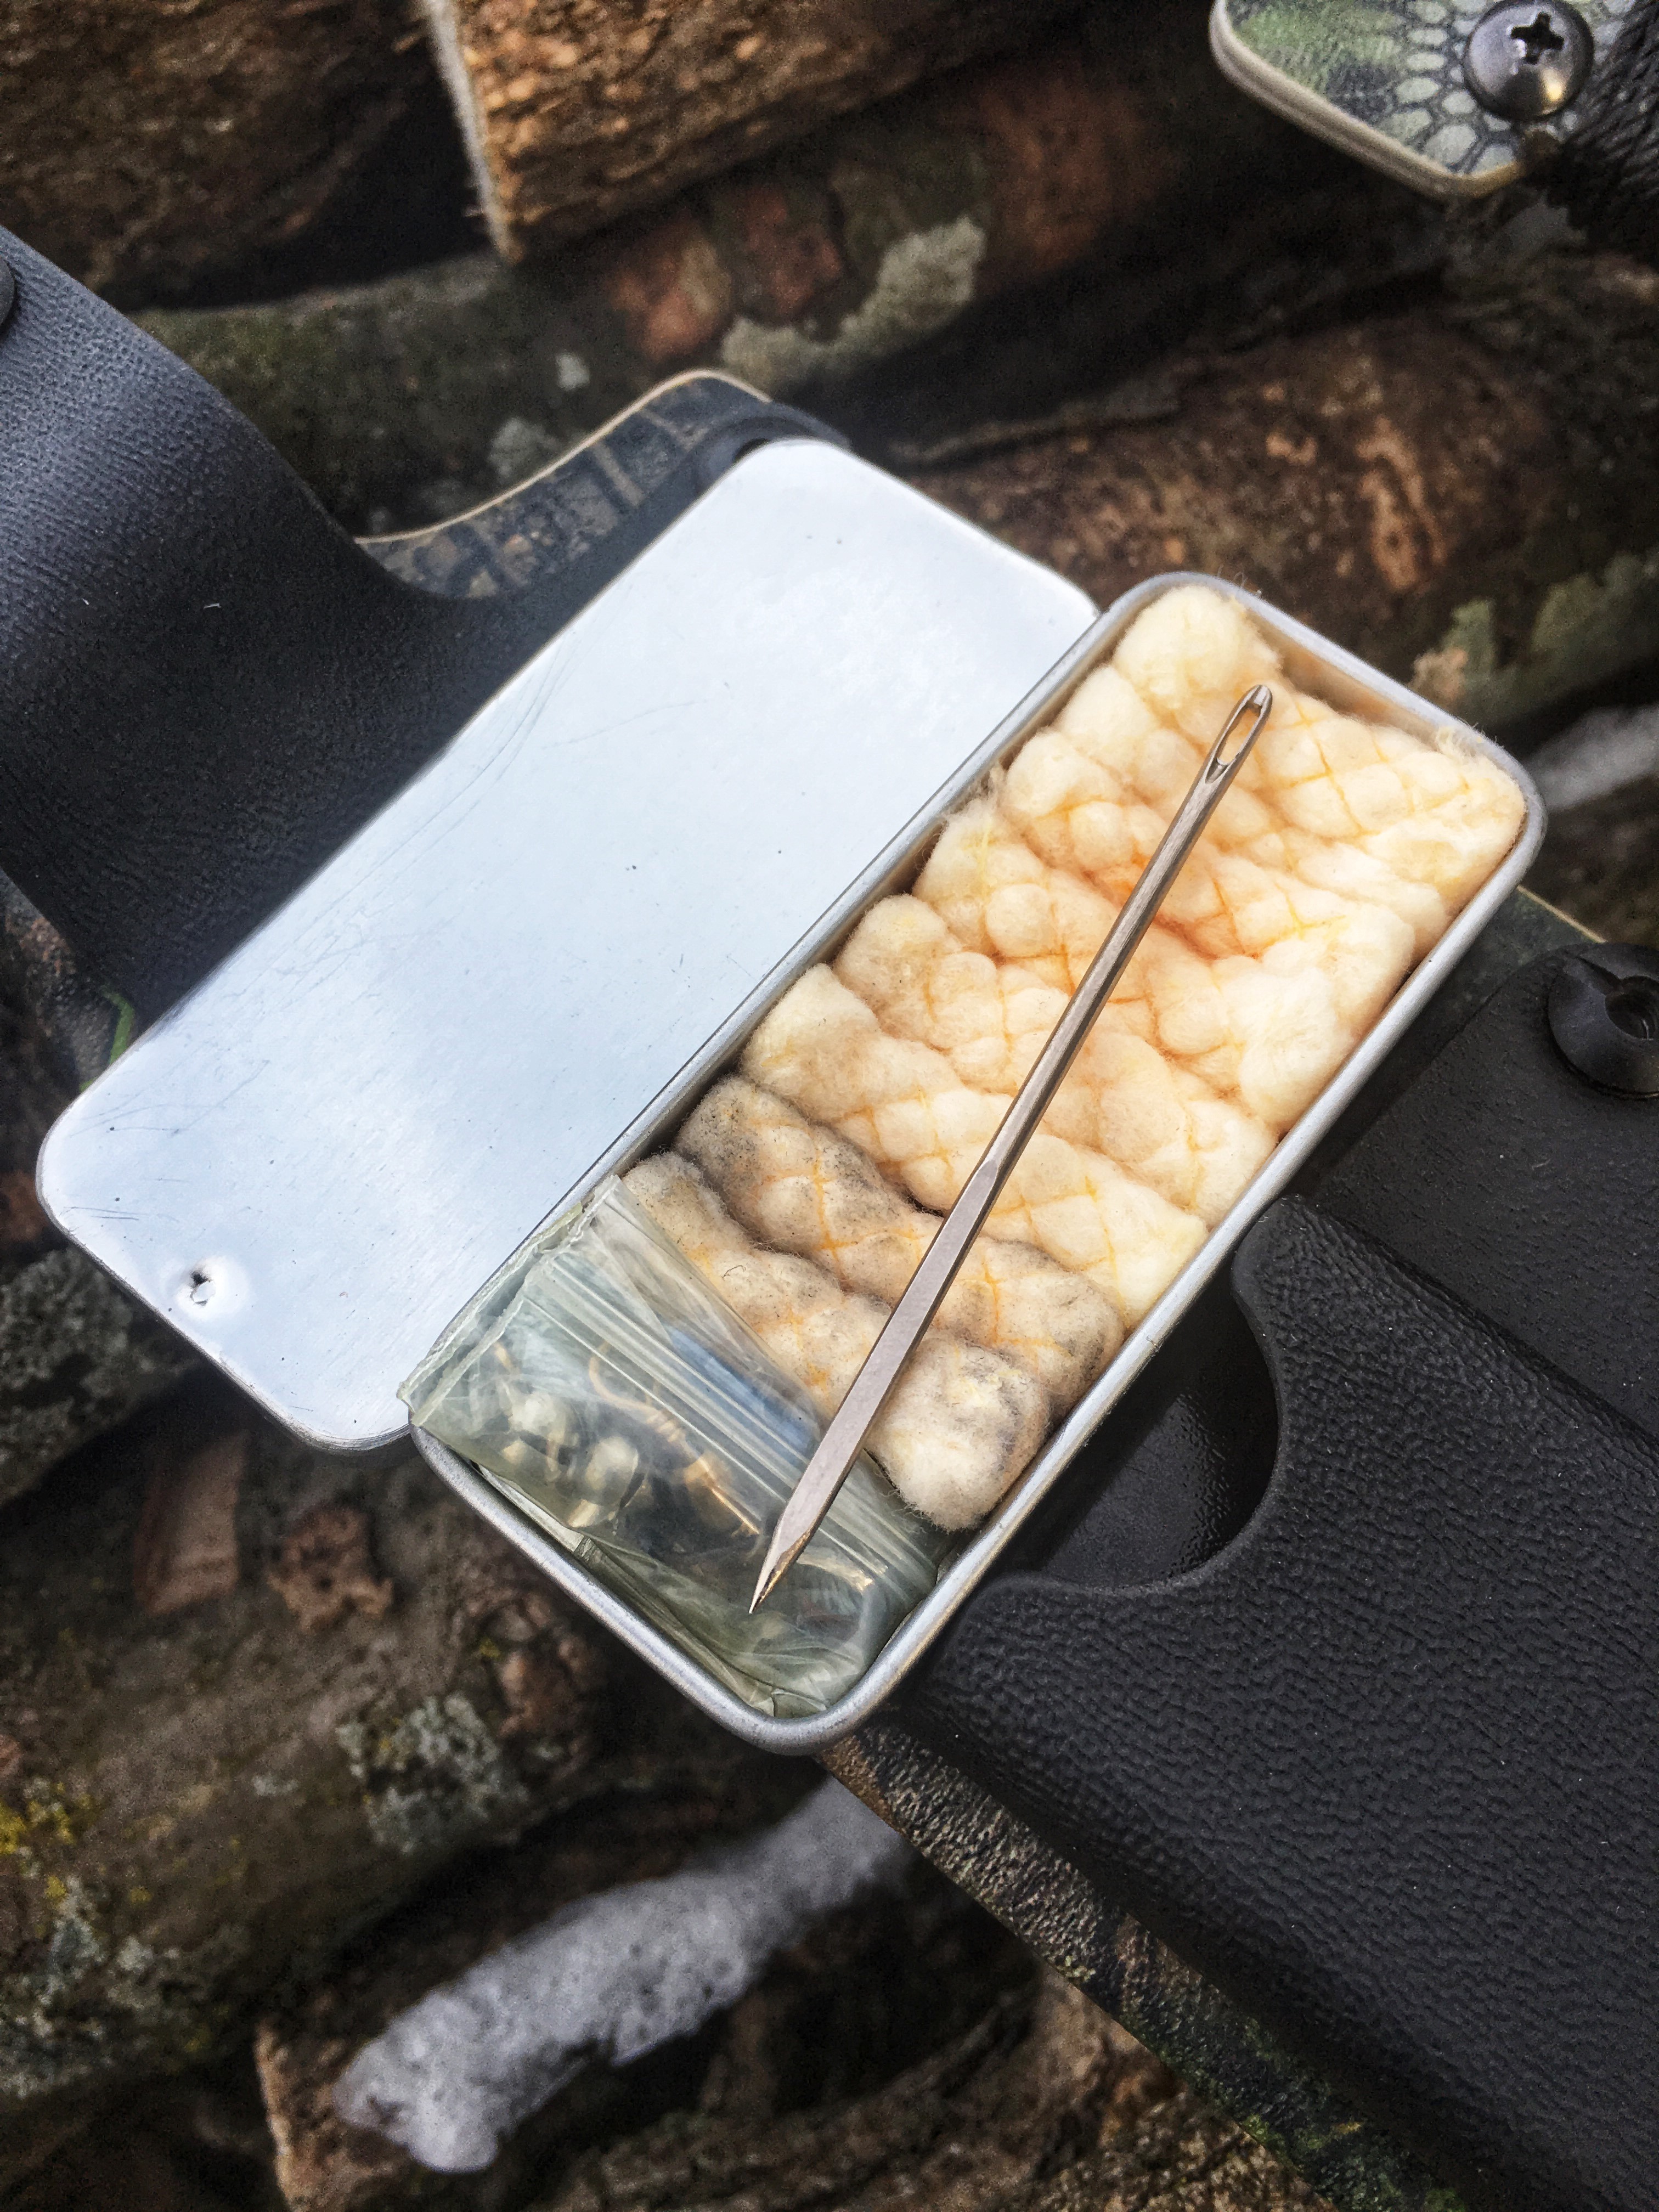
Fire kit

I carry a leather belt pouch I made out of stone oiled kodiak leather. It contains my extensive fire kit. My fire kit contains a flint and steel kit, char material in a tin, lighter, magnifying lens, quik tinder tabs, fat wood fuzz, a chunk of fat wood, fero rod, opinel pocket knife and some jute twine.
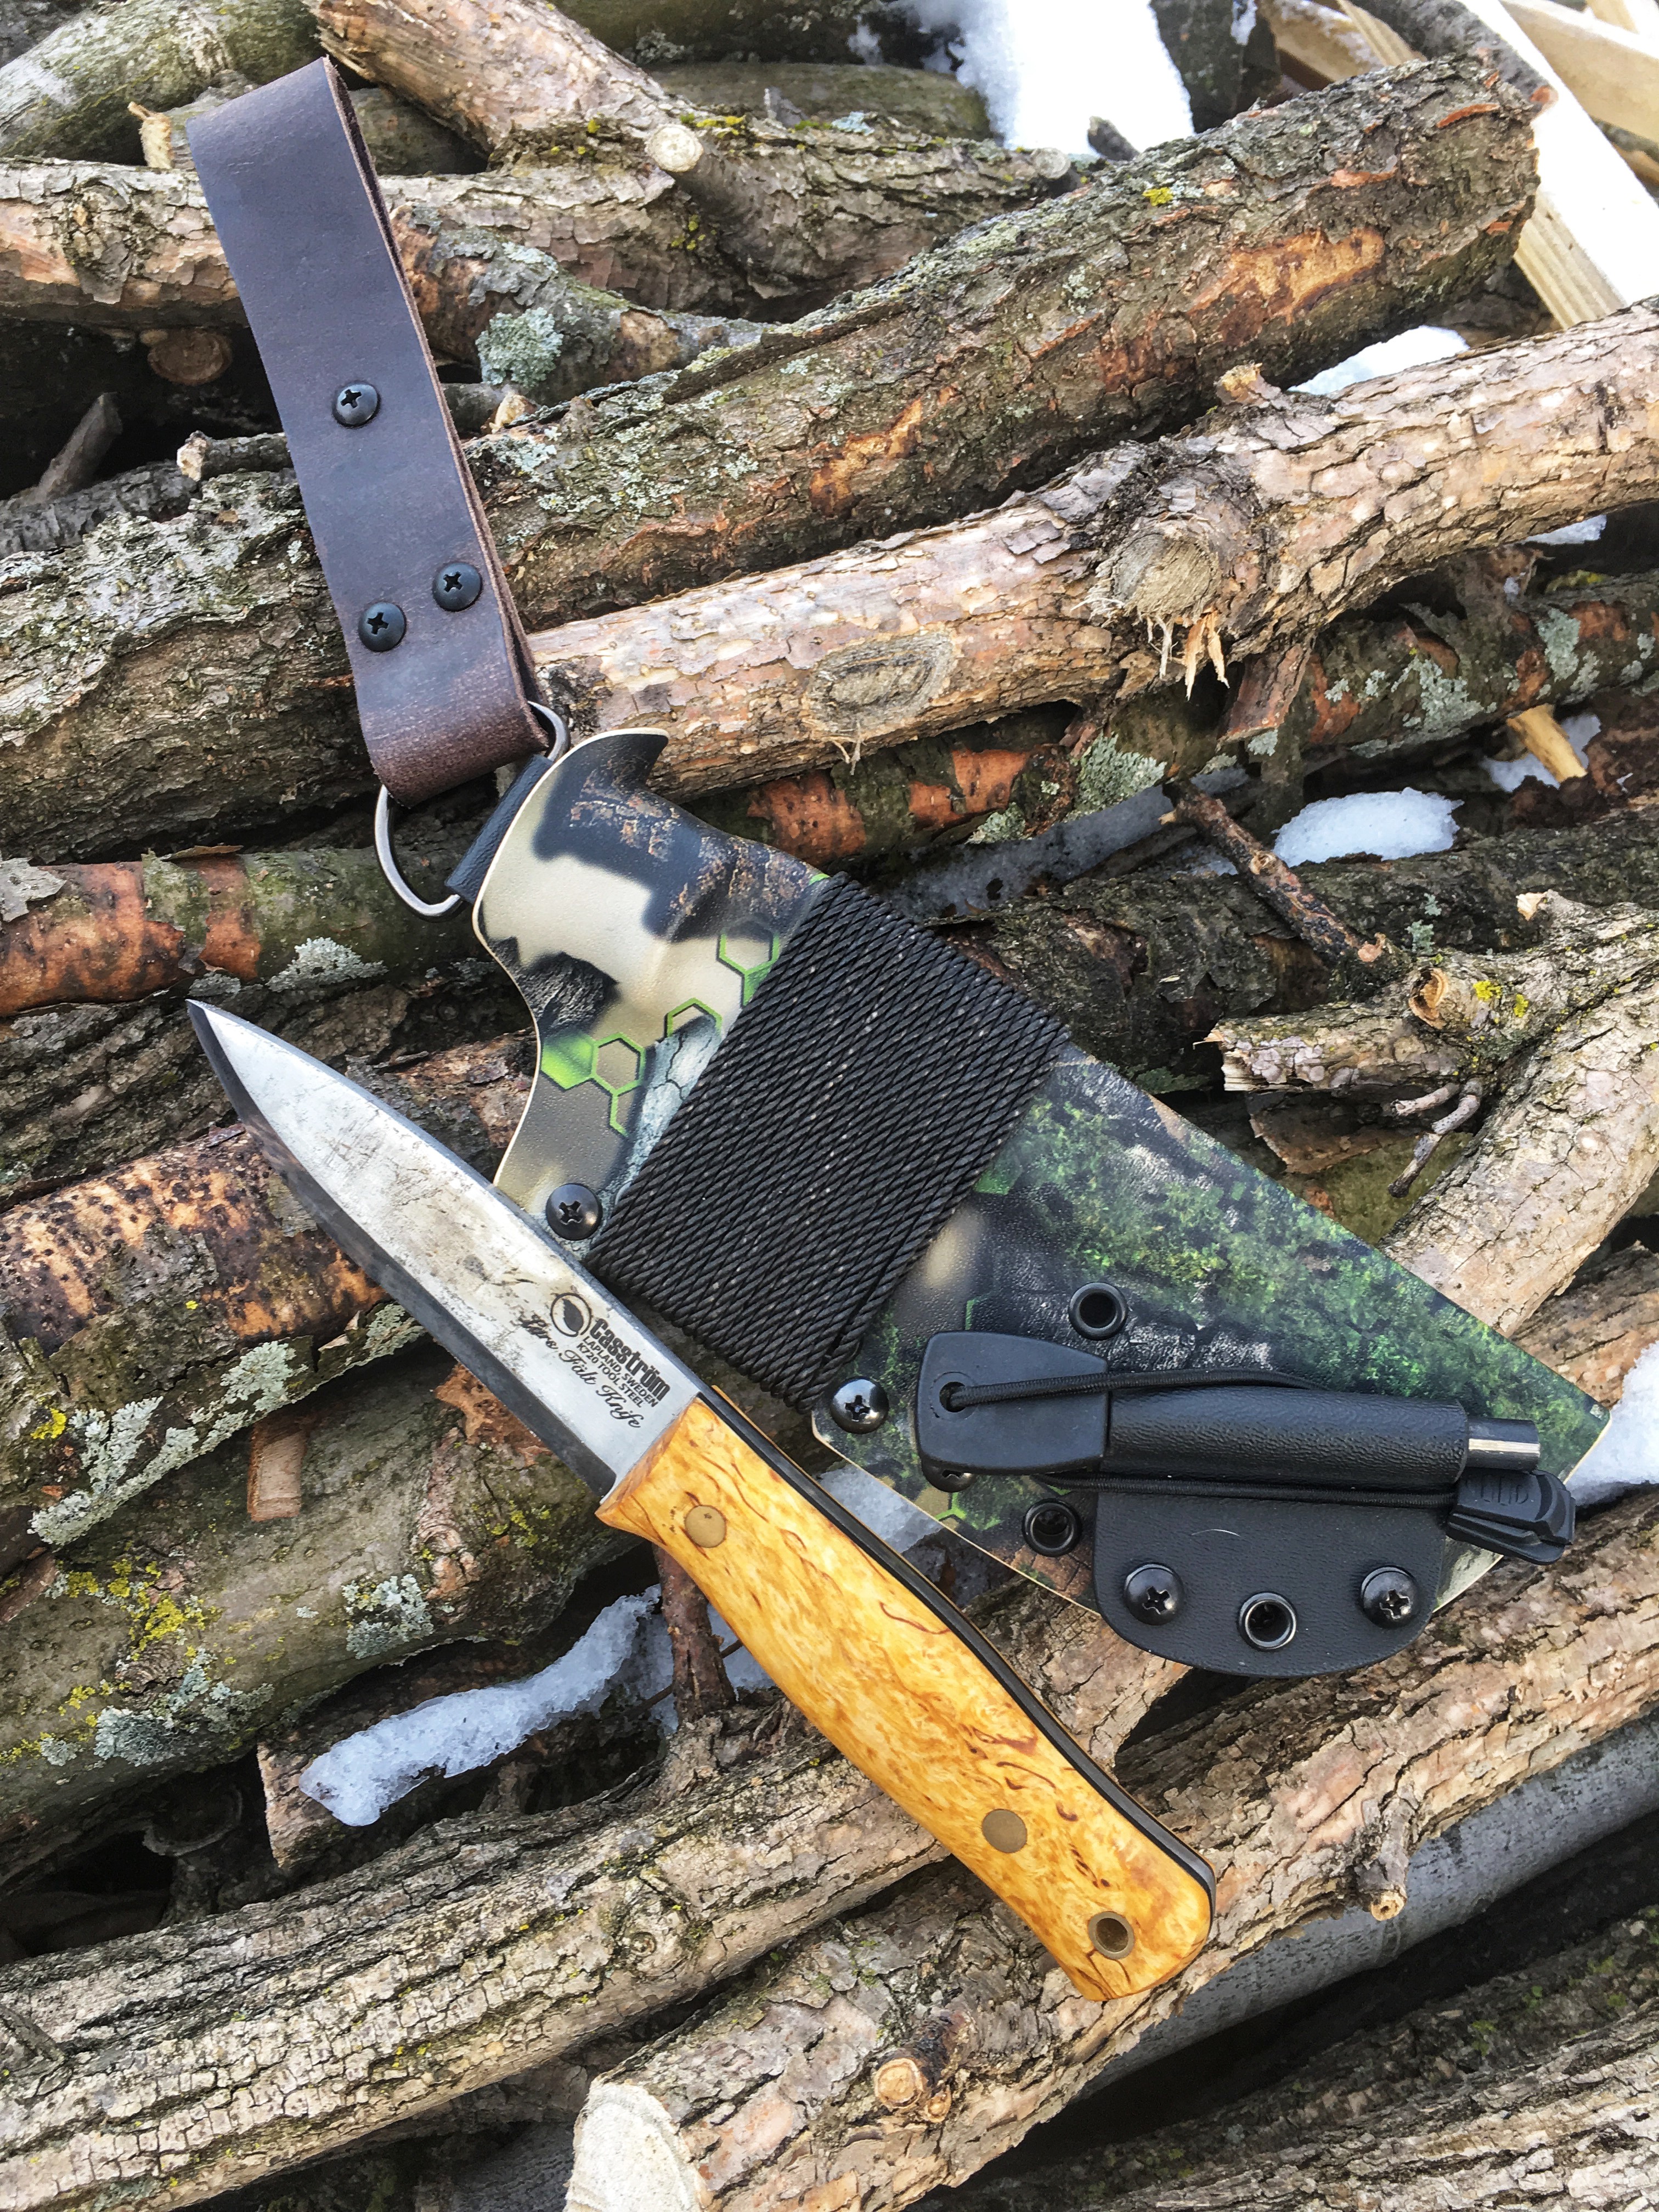
Knife

I always carry a good fixed blade knife that I know I can depend on. Having a good knife can make camp chores a lot easier, allow for game processing, opens up a lot of projects that can be done around camp to stay busy and keep the mind focused if lost and in an emergency situation. A knife is a great tool as long as care is taken and it is used in a safe manner.

This is not an extensive kit by any means, and these are not the only items I generally carry, but these five items are always with me. This is a basis for my wilderness wandering kit. I’m confident in this basic kit barring any serious life threatening injuries. I do carry varying first aid kits when wandering wild places.

What are your top five stay alive items that you always carry, whether urban or wilderness?

CP Kydex Bushcraft Knife Sheath


This past weekend I received my new sheath for my Casstrom Lars Falt Knife. CP Kydex (Country Prepper) made me an updated version of his “bushcraft” sheath. If you’ve never owned one of his sheaths or are aware of him, you’re missing out. I argue that he is one of the best kydex knife sheath makers. I love the quality of his work and how he melds leather and kydex together in a beautiful functional way.

s2.jpg

s1.jpg

I own the first generation “bushcraft” model sheath for my Mora Garberg. That sheath has held up wonderfully and I still love it today. I love that I have so many possibilities at my fingertips. The newer model is bigger and has a larger tin mounted on the back to use for whatever you’d like. In the small tin on my Garberg, I have some quick tinders and a fishing kit. With this larger tin I’m able to carry more quick tinders, a larger fishing kit, a sail needle and some stormproof matches. On the older model you received #36 bankline but on the new sheaths you can choose #36 bankline or Titan Survival Cord wrapped around the sheath. I still chose bankline because that’s what I prefer to use for bowdrills and many other things. I usually always have some 550 cord with me anyways.

s4.jpg

s3.jpg

I also own a sheath that CP Kydex made for my Mora Eldris as well as a mini bic lighter carrier. Here’s a link to his etsy store; www.etsy.com/shop/CPKydex

s5.jpg

I look forward too many years of service from this sheath, like I have from the other ones he’s made for me. I can’t recommend his sheaths enough. If I could, I’d own one of his sheaths for every knife I own. Do you own any CP Kydex Sheaths? Do you like kydex for knife sheaths? What are your thoughts on the look and functionality of these sheaths? Feel free to leave a comment with your answer to any of these questions. Thanks for stopping by and have fun out there exploring this beautiful world.

Automobile Winter Emergency Kit

With colder weather and snow rolling in, it’s time to get your vehicle setup with an emergency kit in case of a breakdown or accident. Accidents and breakdowns never happen at a convenient time. Worse yet is to be stuck during a bad winter storm when there’s accidents happening all over and it’s hard for emergency vehicles to get around and they’re overwhelmed. During those times you’ll have no choice but to take care of yourself or loved ones until help arrives. So, now’s the time to prepare an emergency kit and get it in your vehicle.

Here’s some ideas of things you may want to put in your emergency kit.

  • Wool Blanket or Winter Sleeping Bag
  • Headlamp with extra batteries
  • Emergency Candle (2 or 3)
  • Lighter
  • Folding Knife with Glass breaker
  • Protein Bars or any type of snack bar
  • Fill up a bottle of water and put it in the car every time you go somewhere. You can’t leave a bottle of water in the car all winter because it will constantly freeze and thaw eventually breaking the bottle. (At least where I live anyways)
  • 2-3 Flares
  • Jumper Cables
  • Book and or Card Game
  • Warm Clothing and Boots (For those that by virtue of their job, don’t get to dress warm)


Get in the habit of plugging your phone into the charger as soon as you get into your vehicle. Try to keep your phone charged up when traveling. The last thing anyone wants is a dead phone when you need to make an emergency call.

If you do find yourself in an accident (where no one is seriously hurt) or broken down, you’ll have the peace of mind knowing that you are prepared in case of a long wait for emergency crews. Remember, for your own safety, to stay put inside your vehicle well waiting for help. What extra things do you carry in your automobile winter emergency kit? Thanks for reading and be safe out there this winter.

Quick Tip #17

Here are some simple stocking stuffer ideas for the camper, bushcrafter or outdoor enthusiast in your life.


Ferocerium Rod (fire starter)
Magnesium block (fire starter)
UCO stormproof matches or any matches you can find
Bandana or Survival Bandana (Survival Tips printed on it)
Cordage (550 or 850 paracord, 1000# Paramax, bank line or even Jute twine which can also be used as tinder for starting fires.
Small lengths of fat wood
Compass
Pocket knife or Hobo Pocket Knife
Emergency Fishing Kit
Pocket Chainsaw
Emergency Whistle
Carabiners
Emergency Blanket
Emergency Candles
Books (Survival, Tracking, Weather Patterns, Edible Plants, Shelter Building etc…)
Trail Maps
Pre-packaged Camp food or snacks (Jerky, Mountain House, Backpacker Pantry ect…)
Mora Knife
Flashlight or headlamp
Duct Tape
Small Pocket or small camp stove
Emergency Rain Poncho
Emergency light sticks
Hand and feet warmers
Water Filter


These are just a few ideas for those that are not sure what to throw in their outdoor enthusiasts Christmas stocking. There are plenty of other small useful things that will fit in a Christmas stocking but if you are not sure what to fill that stocking with feel free to use this list to help you out. What outdoor themed things are you putting in a Christmas stocking this year that may not be on this list?

Quick Tip #15

Home Depot, as well as some other stores, sells bags of Fat Wood in their fireplace sections during this time of year. Grab a large bag for around $5-$6. You can add a few pieces to your fire kits or emergency bag for quick access to some good quality dry tinder. You can even add a small bundle to any outdoor enthusiasts stocking and I’m sure they will thank you. When you’re ready to use it just shave it down and add a flame or spark from a ferocerium rod. So pick some up and give it a try!


image1

UST Orange Survival Bandana

I’m not one for promoting deals I’m running on my website here on my blog but I thought the current deal was worth mentioning. Now through December, with every purchase of $25 or more, you will receive a UST orange survival bandana. These are no ordinary bandanas. Printed on them are many survival tips that can be very useful in the event of a survival situation. These would be great for kids or adults that are lacking in survival/camping knowledge. There’s the obvious many extremely useful ways to use a bandana but now you would also have many survival tips that you wouldn’t necessarily have to remember or have to call back to memory in a survival scenario. This is just a great way to take something you may already be carrying and make it even more useful. Also, all orders in the continental U.S. will receive free standard shipping through December. Just click on the store button and place an order of $25 or over to receive your free bandana and free standard shipping. Hope everyone is doing well and getting the chance to enjoy the great outdoors.

survival-bandana

Quick Tip #14

You know that shiny emergency blanket you have tucked away in your backpack or emergency kit? It’s got so many more uses than to be just used simply as an emergency blanket. One use we will be talking about quickly today is as a heat reflector near a fire.

Find yourself two fairly straight sticks that are about an inch or so thick and will be about two feet longer than the shorter side of the emergency blanket. Sharpen one end of each stick to a point. Now lay your emergency blanket out on the ground stretched out flat. Take one of your sticks and lay it across the short side of the emergency blanket. Leave about 1 ½ feet of the sharpened end sticking out passed the blanket and about ½ foot on the other end. Start to roll the emergency blanket around the stick about 6 or so times. Now do the same thing on the other side of the emergency blanket with the other stick.

You are now ready to setup a heat reflector by your fire. Choose whether you want the heat reflector across the fire from you or behind you. If you choose to place the heat reflector near the fire across from you, make sure, depending on the size of your fire that the emergency blanket is a reasonable distance away from the fire so that it doesn’t melt or get holes in it from sparks flying around.

Once you have chosen where you want to place the heat reflector find a thick stick or something else that can be used as a hammer. Push the pointed end of each stick into the ground as far as you can well keeping the emergency blanket in between the two sticks as tight as possible. Now hammer the blunt end of each stick, making sure not to hit so hard you break the sticks wrapped in the emergency blanket, so that the pointed end goes further into the ground. Make sure to leave 2-4 inches in between the ground and the emergency blanket so that it is less likely to get damaged. You should now have a nice heat reflector that will help you capture some of the lost heat from your fire. If you set the reflector up behind you it will help remedy the issue of having a cold backside.

As always get out and enjoy nature at your own risk and have fun doing it. Thanks for taking the time to read and feel free to leave a comment or let me know some of the extra ways you use emergency blankets.

Quick Tip #13

When putting together an emergency fishing kit try using braided fishing line instead of mono. If you’ve ever tried to straighten out that emergency fishing line in any of the small kits available on the market today you know it’s a feat in itself to get it untangled and to try to ever get it straight again. Braided fishing line can take being wound up tightly unlike mono line can. Also the braided line is thinner in comparison to the mono for the same pound test line. If you ever need that emergency fishing kit you made you’ll be happy (jumping for joy) that you chose to use braided fishing line over mono. Which fishing line do you prefer, braided or mono, for an emergency fishing kit and why?

Survival and Bushcraft Knives

As a seller of outdoor survival gear I setup at a lot of outdoor shows and gun shows as a vendor. It never fails; most people will buy cheaply made gear over quality made gear, even if their life may depend on it, when it comes to cost. I see this at every show I‘m at. I sell good quality survival and bushcraft knives and then I have to carry cheap china made knockoffs that I wouldn’t trust my life with, but at least ¾ of my knife sales come from the cheap knives. I understand people want to save money somewhere but a knife is a very important tool for survival and you don’t want one that is going to fail you when you need it most. I carry multiple pocket knives and a couple of them are cheap pocket knives but I always have one good quality knife with me at all times if possible.

Before you just go to the store or knife show and find yourself staring at knives trying to pick one out to buy without even knowing what you want in the knife or what your intentions are for it, figure out ahead of time what your purpose is for this knife and what characteristics you want this knife to have. It’s never a good idea to buy survival or bushcraft tools spontaneously. You will most likely regret it and you’ll probably end up with a tool or item that doesn’t quite fit your needs. Below are a few examples of some things you should answer before purchasing a survival or bushcraft knife.

Answer These before Going to Buy a Knife

• What is your intended use for the knife?
• How much use will it get?
• Is it a backup knife or your main survival or bushcraft knife?
• Do you want a high carbon steel or stainless steel blade?
• How long do you want the blade and handle to be?
• How thick would you like the steel to be?
• What material would you prefer the handle be made out of?
• Do you want a good hefty knife?
• What kind of grind do you prefer the knife have?
• Do you want serrations on the knife?

Questions to Ask Well Looking at Knives

• Is it comfortable in your hand?
• Is the knife to long or to short?
• Will the knife slip out of your hand if the handle gets wet?
• Is it full tang?
• Where was the knife made?
• Does the knife look and feel durable?
• Does the knife have a good quality and durable sheath?
• Will the knife easily fall out of the sheath or does it lock in?
• Is the sheath to bulky that you won’t wear or use it?

These are just some sample questions that you should ask yourself before and well you are buying a knife. There are a lot of good quality custom knife makers out there, so you can custom make a knife to fit what you want. You can have a custom knife made at a very reasonable price if you look around online. There are also some quality knife companies that have decently priced survival and bushcraft knives available. Tops, Mora, Condor, Bushcraft Northwest, Blind Horse Knives, Esee, Falkniven and Gerber (only the U.S. made knives) all make great survival and bushcraft knives and some of them are very reasonably priced. Mora is a great entry knife into bushcraft and they are very inexpensive. They are made in Sweden.

Personally I try to buy knives that range from $30-$200, maybe even up to $300. I’m afraid that if I spend much more than that, I’ll be afraid to actually use the knife for its intended purpose. You can also, if you have the equipment, toy around with making your own knives. There are a lot of YouTube videos available to help you make your own knife.
My point in all this is to say that when it comes to a knife or any other survival tool that is going to take a lot of abuse and that your life may at some point depend on, it is not worth saving a little bit of money well sacrificing quality and durability. A better quality knife will last you much longer in the end. What knife do you carry for survival or bushcraft purposes? How much did you pay for your knife or are willing to pay for a quality made survival or bushcraft knife?

Survival Bracelets

With all the popularity over “survival bracelets” the past couple years, I wanted to draw your attention to some survival bracelets that are made of much more than just cordage. Each bracelet is built and hand tied by us here at Armstrong Survival Gear LLC (family owned and operated). All of our cord is American made and weight tested. We try to put only quality parts into our products and we make changes periodically to better our products not to cut costs at the expense of customers.

Each of these bracelets was designed by me to help cover different needs that people would have based on their survival situation and level of expertise. Some people desire to carry and rely on as little gear as possible and others want to carry and rely on as much gear as possible. So I designed different bracelets for each of these types of people. From our base model the Fire Bracelet, which is very basic, to our Explorer Bracelet which has everything you could want in a survival kit you can wear on your wrist.

We have four models of survival bracelets. They are the Fire Bracelet, the Beaver Bracelet, the Minimalist Bracelet and the Explorer Bracelet. Each model contains different products that will help aid you if you ever find yourself in a survival situation. Here is information as well as specs for each model of bracelet.


Fire Bracelet

You’ll have everything you need to get a fire started; fire steel, a striker, tinder and paracord for making a bow drill. We’ve got your back!
Contains:
• 550 Paracord
• Whistle Buckle
• P-38 Can Opener
• Fire Toggle
• 2’ Jute
*optional quick tinder with ranger band


Beaver Bracelet

This bracelet will give you the help you need to build a shelter or to start a fire. We’ve got your back!
Contains:
• 550 Paracord
• Whistle Buckle
• P-38 Can Opener
• Fire Toggle
• Ranger Bands
• Compass
• Wire Saw
*optional quick tinder with ranger band


Minimalist Bracelet

Here is a simple bracelet to take care of some basic needs of survival, from starting a fire to being able to fish for some food. We’ve got your back!
Contains:
• 550 Paracord
• Whistle Buckle
• P-38 Can Opener
• Fire Toggle
• Ranger Bands
• Compass
• 30’ 50lb braided fishing line (won’t be a tangled mess)
• 2 #8 hooks
• 2 weights
• 2 swivels
*optional quick tinder with ranger band


Explorer Bracelet

Explore the great outdoors with peace, knowing you have the very best survival bracelet available. We’ve got your back!
Contains:
• 550 Paracord
• Whistle Buckle
• P-38 Can Opener
• Fire Toggle
• Ranger Bands
• Compass
• 2’ Jute Twine
• 18” Snare Wire
• Wire Saw
• 30’ 50lb braided fishing line (won’t be a tangled mess)
• 2 #8 hooks
• 2 weights
• 2 swivels
• 18” 45lb lead
• Dry Fly
• Bobber
• 2 safety pins
*optional quick tinder with ranger band
Here is the link if you would like to check out any of our bracelets: http://armstrongsurvivalgear.com/category/survival-bracelets/

 
My goal in creating these survival bracelets was to better something that many people were already wearing anyways. Why not better your chance of survival by wearing a bracelet that contains many aids for survival instead of one that only carries cordage? I like all my gear to be as versatile and multi functional as possible, thus the reason I designed these bracelets. These bracelets can be worn daily, thrown in an emergency bag, clipped to your backpack or clipped to your belt loop for easy access. If you are an avid outdoorsman, outdoors women or are just preparing for a possible emergency, these survival bracelets may be of interest to you. Do you wear a 550 para cord bracelet already? What limitations or capabilities does your current bracelet have?

One side note:

Our bracelets do not carry anything for water purification other than purifying water over the fire that these bracelets can help you start. I was going to include water purification tabs when I first designed these survival bracelets but the purification tabs do expire and I didn’t want people to rely on something that may not be any good when they need it most. What I would recommend doing if you order one of our bracelets is to get some Aquamira purification tabs and slip one or two tabs in their packaging underneath one of the ranger bands. This way you will have easy access to the tablets and you can change them out periodically as they expire.